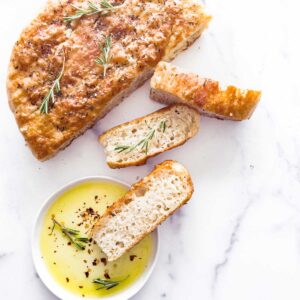
Easy cast iron focaccia bread is a delicious and easy-to-make bread that you can make at home. This focaccia bread has a crispy crust and a soft, pillowy interior, and is always a hit! This bread can also be used as a pizza crust, or as a delicious sandwich bread. Get ready to show off your focaccia-making skills with this simple, step-by-step recipe.

? What is no-knead focaccia bread?
No knead focaccia bread is a simple bread recipe made with water, flour, salt, yeast, and olive oil. The ingredients are stirred together and left to rise for a few hours, then, the dough is topped with herbs and baked. Easy peasy.
Stir the ingredients together in the morning, and let the dough rise while you're at work. When you get home, it's ready to transfer to the cast iron for a quick rise and bake for 30 minutes, and walla!-you have freshly baked focaccia bread with dinner.
Serve this cast iron focaccia bread with blush sauce pasta or creamy mushroom pasta, pecan apple salad, or restaurant-style Caesar salad and some grilled flat iron steak for an amazing dinner.
Jump to:
- ? What is no-knead focaccia bread?
- ⭐ Why You'll Love This Easy Recipe
- ? Tips for Success
- ? Equipment You'll Need
- ? Cast Iron Focaccia Bread Ingredients
- ? How to Make No-Knead Cast Iron Focaccia Bread
- ? Topping Focaccia Bread
- ? How to Serve Focaccia Bread
- ? Make Ahead, Storage, and Reheating
- Recipe
- More Bread Recipes You'll Love
⭐ Why You'll Love This Easy Recipe
- Easy to make: Simply stir, rise, and bake!
- No special skills are needed!
- It's forgiving: You can adjust the flour-water ratio a little and still get amazing results.
- It's versatile. You can use this bread for anything from pizza and sandwiches to bruschetta and croutons.
- Your guests will love it!
? Tips for Success
Measure ingredients accurately.
Allow the dough to rest and rise properly: This bread requires an extended rest and rise time to allow the gluten to develop and the bread to become soft and airy. Make sure to give the dough enough time to rest, and don't rush the rising process.
Don't overwork the dough when stirring the ingredients together.
Use a cast iron skillet: To get a crispy bottom, using a cast iron skillet is key.
Let the bread cool before slicing. Resist the urge to slice into the bread immediately after baking. Let the bread cool for about 10-15 minutes before slicing to allow the crumb to set and prevent it from becoming gummy.
? Equipment You'll Need
- Large Mixing Bowl
- Spatula
- Cast Iron Pan (10-inch size)
- Measuring Cups
- Measuring Spoons
- Table Knife to level flour
- Plastic Wrap
- Clean Kitchen Towel
? Cast Iron Focaccia Bread Ingredients

See the recipe card for quantities.
- Flour: Use a high-quality all-purpose, unbleached flour like King Arthur.
- Yeast: active dry yeast. I like to use Red Star and buy it in bulk at Costco.
- Salt: I use Diamond Kosher salt and a finishing salt like Maldon for the top of the focaccia bread. The finishing salt adds a nice crunchy texture to the top of the bread, and I highly recommend adding it for extra crunch!
- Water: Room temperature water or slightly warm water. You can use cold water, but the bread may take longer to rise depending on the temperature of your kitchen.
- Olive Oil: Good quality extra virgin olive oil. The olive oil will not only add a nice flavor, but will also help to crisp up the bottom, top, and sides of the bread.
- Herbs: I use a combination of dried herbs. For this recipe, I used dried basil, oregano, and thyme, but you can use whatever you love-get creative!
Can I make no knead focaccia bread without yeast?
Yeast is an essential ingredient for no-knead focaccia bread. The yeast helps the dough rise and develop the proper texture.
Can I make no knead focaccia bread gluten-free?
Yes, you can use gluten-free flour blends to make no knead focaccia bread. However, the texture and flavor may be slightly different from traditional wheat-based focaccia bread, and I don't recommend it with this recipe. Check out some gluten-free recipes for best results.
Can I use a sourdough starter in no knead focaccia bread?
Yes, you can use a sourdough starter in no-knead focaccia bread; however, you will still need to use yeast to get a nice rise in the dough. You may need to adjust the amount of water you use if a starter is added. Be sure to add the water last and add a little at a time until the dough has the right consistency.
? How to Make No-Knead Cast Iron Focaccia Bread
Prep the dough:

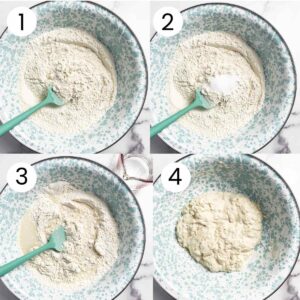
1 - In a large mixing bowl, stir together the flour and instant yeast.
2 - Add salt and stir to combine
3 - Add the warm water, and stir with a spatula until a sticky dough forms. If more water is needed then the recipe requires, add 1 tablespoon at a time until your dough looks right.
4 - This is how the dough should look.
STIRRING TIP: Don't overwork the dough; focaccia bread is meant to be a rustic, imperfect bread. Avoid overworking the dough or trying to shape it perfectly. Let the dough do its thing, and embrace any imperfections-they will still be delicious!

5 + 6 - Cover the bowl with plastic wrap, then cover it with a clean kitchen towel.
7 - Place the bowl in a warm area (like on top of your stove) and let it rise at room temperature for 4-8 hours, or until the dough has doubled in size and is full of air bubbles.

8 - Grease a cast iron pan with olive oil. Make sure to get the sides as well. Carefully scrape the dough out of the bowl and into the greased cast iron pan.
9 - Use your fingertips to gently stretch the dough out to fit the pan, making dimples with your fingertips along the way.
10 - Cover the pan with the bowl and towel and allow it to rise for another 30-60 minutes. (This time will depend on the temperature of your kitchen.)
11 - Drizzle with olive oil and evenly sprinkle the dried herbs, flaky sea salt, or other toppings of your choice (if using).
Can I add toppings to my no knead focaccia bread? Yes, toppings such as herbs, cheese, olives, or tomatoes can be added to the dough before (some during) baking to add flavor and texture to the bread. (See below for topping tips and ideas.)
Cooking Cast Iron Focaccia Bread

Preheat your oven to 450°F (230°C).
12 - Bake the bread on the center rack for 30 minutes at 450°F (230°C) until the crust is golden brown, and the bread is cooked through.
13 - Remove the bread from the oven and let it cool in the pan for a few minutes before slicing and serving.
? Topping Focaccia Bread
Focaccia Topping Ideas
- Fresh or dried herbs: rosemary, thyme, oregano, basil, parsley, and sage, are all great choices.
- Garlic: minced or sliced garlic cloves can add a delicious aroma and flavor to focaccia bread. (Add garlic halfway through the baking process so the garlic doesn't burn.)
- Olive oil: drizzle olive oil over the top of the dough before baking to add flavor and moisture to the bread.
- Cheese: mozzarella, cheddar, gruyere, Parmesan, feta, blue cheese, and goat cheese can be added to the top of the bread before baking for cheesy focaccia bread.
- Vegetables: sliced tomatoes, bell peppers, onions, and olives can be placed on top of the dough for added texture and flavor.
- Sea salt: Sprinkle coarse sea salt on top for even more flavor and texture.
- Pesto: spread pesto over the top of the dough before baking for a delicious and flavorful twist.
Elevate This Bread: Gourmet Focaccia Topping Combination Ideas
- Roasted onion, thyme, and parmesan Cheese
- Fresh tomato, basil and parmesan or mozzarella cheese
- Sweet potato, fresh sage and goat cheese
- Garlic, olive oil, sun-dried tomato, feta and pine nuts
TOPPING TIP: Make sure to use toppings that won't release too much moisture during baking, which can make the bread soggy. Good options include sliced tomatoes, olives, fresh herbs, and cheeses.
? How to Serve Focaccia Bread
There are many ways to use focaccia bread and trust me, it will take your meal to the next level! Here are a few ideas:
- Side dish: Serve with soups, salads, and pasta dishes.
- Use as a sandwich bread
- Pizza crust: just add tomato sauce, mozzarella cheese, and your favorite pizza toppings for an easy pizza night.
- Appetizer or snack: Focaccia bread can be cut into bite-sized pieces or strips and turned into bruschetta or served with dips like hummus or spreads like chimichurri, pesto, tapenade, or soft cheeses.
- Breakfast or brunch dish: Focaccia bread can be toasted and served with butter, jam, or honey for a simple, delicious breakfast or brunch side. You can also use it as a base for breakfast sandwiches, as a substitute for toast, or as a bread for French toast.
? Make Ahead, Storage, and Reheating
Make ahead:
Store in an airtight container or plastic bag at room temperature for up to 2 days or in the refrigerator for up to 5 days. If you need to store it for longer than that, you can freeze it for up to 3 months.
How to freeze focaccia bread:
- Allow the bread to cool completely to room temperature.
- Wrap the bread tightly in plastic wrap, aluminum foil, or freezer paper to prevent freezer burn.
- Place the wrapped bread in a freezer-safe plastic bag or an airtight container.
- Label and date the bag.
To thaw, simply remove it from the freezer and let it come to room temperature.
Reheating Focaccia Bread
- Oven: Preheat your oven to 350°F. Place the focaccia bread directly on the oven rack or on a baking sheet. Heat the bread for 5-10 minutes, or until it is warm and crispy.
- Toaster oven: Place the focaccia bread directly on the oven rack or on a baking sheet. Heat the bread for 2-5 minutes, or until it is warm and crispy.
- Skillet: Using a nonstick skillet or cast iron pan, drizzle focaccia slices with a little olive oil and griddle for 2-3 minutes on each side until crispy.
- Air Fryer: Cook for 3 minutes at 370 F or until warm and crispy.
- Microwave: Place the focaccia bread on a microwave-safe plate or dish and microwave on high for 20-30 seconds, or until it is warm.

Recipe
Cast Iron Focaccia Bread
Click the stars to rate.
*Easily adjust serving size to your liking by clicking the number under servings or with the boxes below in the ingredients section.
Equipment
- Cast Iron Pan 10 inch
- Table Knife to level flour
- Plastic Wrap
Ingredients
- 3 Cups All-purpose flour spooned and leveled
- 1 ¼ Cups Warm Water plus more as needed
- 1 teaspoon Instant Dry Yeast
- 2 teaspoon Kosher Salt
- ¼ Cup Olive Oil divided
- 1 teaspoon Dried Herbs optional, for topping
- 1 Tsp Flaked Sea Salt optional, for topping
Instructions
- In a large mixing bowl, stir together the flour (3 cups) and instant yeast (1 tsp).
- 2 - Add salt (2 tsp) and stir to combine. (Be sure to add the salt separately from the yeast).
- 3 - Add the warm water (1 ¼cups), and stir with a spatula until a sticky dough forms. Add more water one tablespoon at a time until the desired consistency is reached. (see image 4)

- Cover the bowl with plastic wrap, then cover it with a clean kitchen towel. Place the bowl in a warm area (like on top of your stove) and let it rise at room temperature for 4-8 hours, or until the dough has doubled in size and is full of air bubbles.
- Grease a cast iron pan with olive oil. Make sure to get the sides as well. Scrape the dough out of the bowl and into the greased cast iron pan.
- Using your fingertips, gently stretch the dough out to fit the pan, dimpling the dough with your fingertips along the way.
- Cover the pan with the bowl and towel and allow to rise for another 30 -60 minutes. (This time will depend on the temperature of your kitchen.)
- When the dough has doubled in size again, preheat your oven to 450°F (230°C). Drizzle the top of the dough with olive oil (1-2 tbsp) and evenly sprinkle the dried herbs (1tsp), sprinkle with flaky sea salt (1 tsp), if using.
- Bake the bread on the center rack for 30 minutes or until the crust is golden brown, and the bread is cooked through.
- Remove the bread from the oven and let it cool in the pan for 10-15 minutes before slicing and serving.
Notes
Make Ahead and Storage:
Store in an airtight container or plastic bag at room temperature for up to 2 days or in the refrigerator for up to 5 days. If you need to store it for longer than that, you can freeze it for up to 3 months.How To Freeze Focaccia Bread:
- Allow the bread to cool completely to room temperature.
- Wrap the bread tightly in plastic wrap or aluminum foil, or freezer paper to prevent freezer burn.
- Place the wrapped bread in a freezer-safe plastic bag or airtight container.
- Label and date the bag.
Reheating Focaccia Bread
- Oven: Preheat your oven to 350°F. Place the focaccia bread directly on the oven rack or on a baking sheet. Heat the bread for 5-10 minutes, or until it is warm and crispy.
- Toaster oven: Place the focaccia bread directly on the oven rack or on a baking sheet. Heat the bread for 2-5 minutes, or until it is warm and crispy.
- Skillet: Using a nonstick skillet or cast iron pan, drizzle focaccia slices with a little olive oil and griddle for 2-3 minutes on each side until crispy.
- Air Fryer: Cook for 3 minutes at 370F or until warm and crispy.
- Microwave: Place the focaccia bread on a microwave-safe plate or dish and microwave the on high for 20-30 seconds, or until it is warm.


Sharon
Second time making it, love not having to "babysit" it, none of that kneading etc etc etc♥️
Suzie J.
Who knew bread baking could be so easy?! Thanks again, Sharon! Xo, Suzie
Sharon
Well, i will say this as I'm baking this bread - your step-by-step processes and pictures are spot on! Now I'm excited because this is my first making bread, and focaccia bread at that! What's funny is my oven temp has never been this high since I've been cooking. I'm waiting for the finished product ?? Thx
Suzie J.
Aww, thank you, Sharon! I'm truly honored that you chose my recipe for your first time baking bread. I hope it turned out beautifully and that you loved every bite! ? Xo, Suzie
Sharon
It's a 10 for me! It turned out great. I also shared some with friends and they loved, including a 17 year old (?) . It's now on my regular rotation?
Suzie J.
That's wonderful to hear! Thank you, Sharon. I love that you and your friends love this bread! Thank you for the wonderful feedback. Xo, Suzie
Sue
Baked this bread the other night and absolutely loved it! Easy and delicious. Thank you for a terrific recipe.
Suzie J.
Thank you, Sue! I'm so happy you loved it. Xo, Suzie