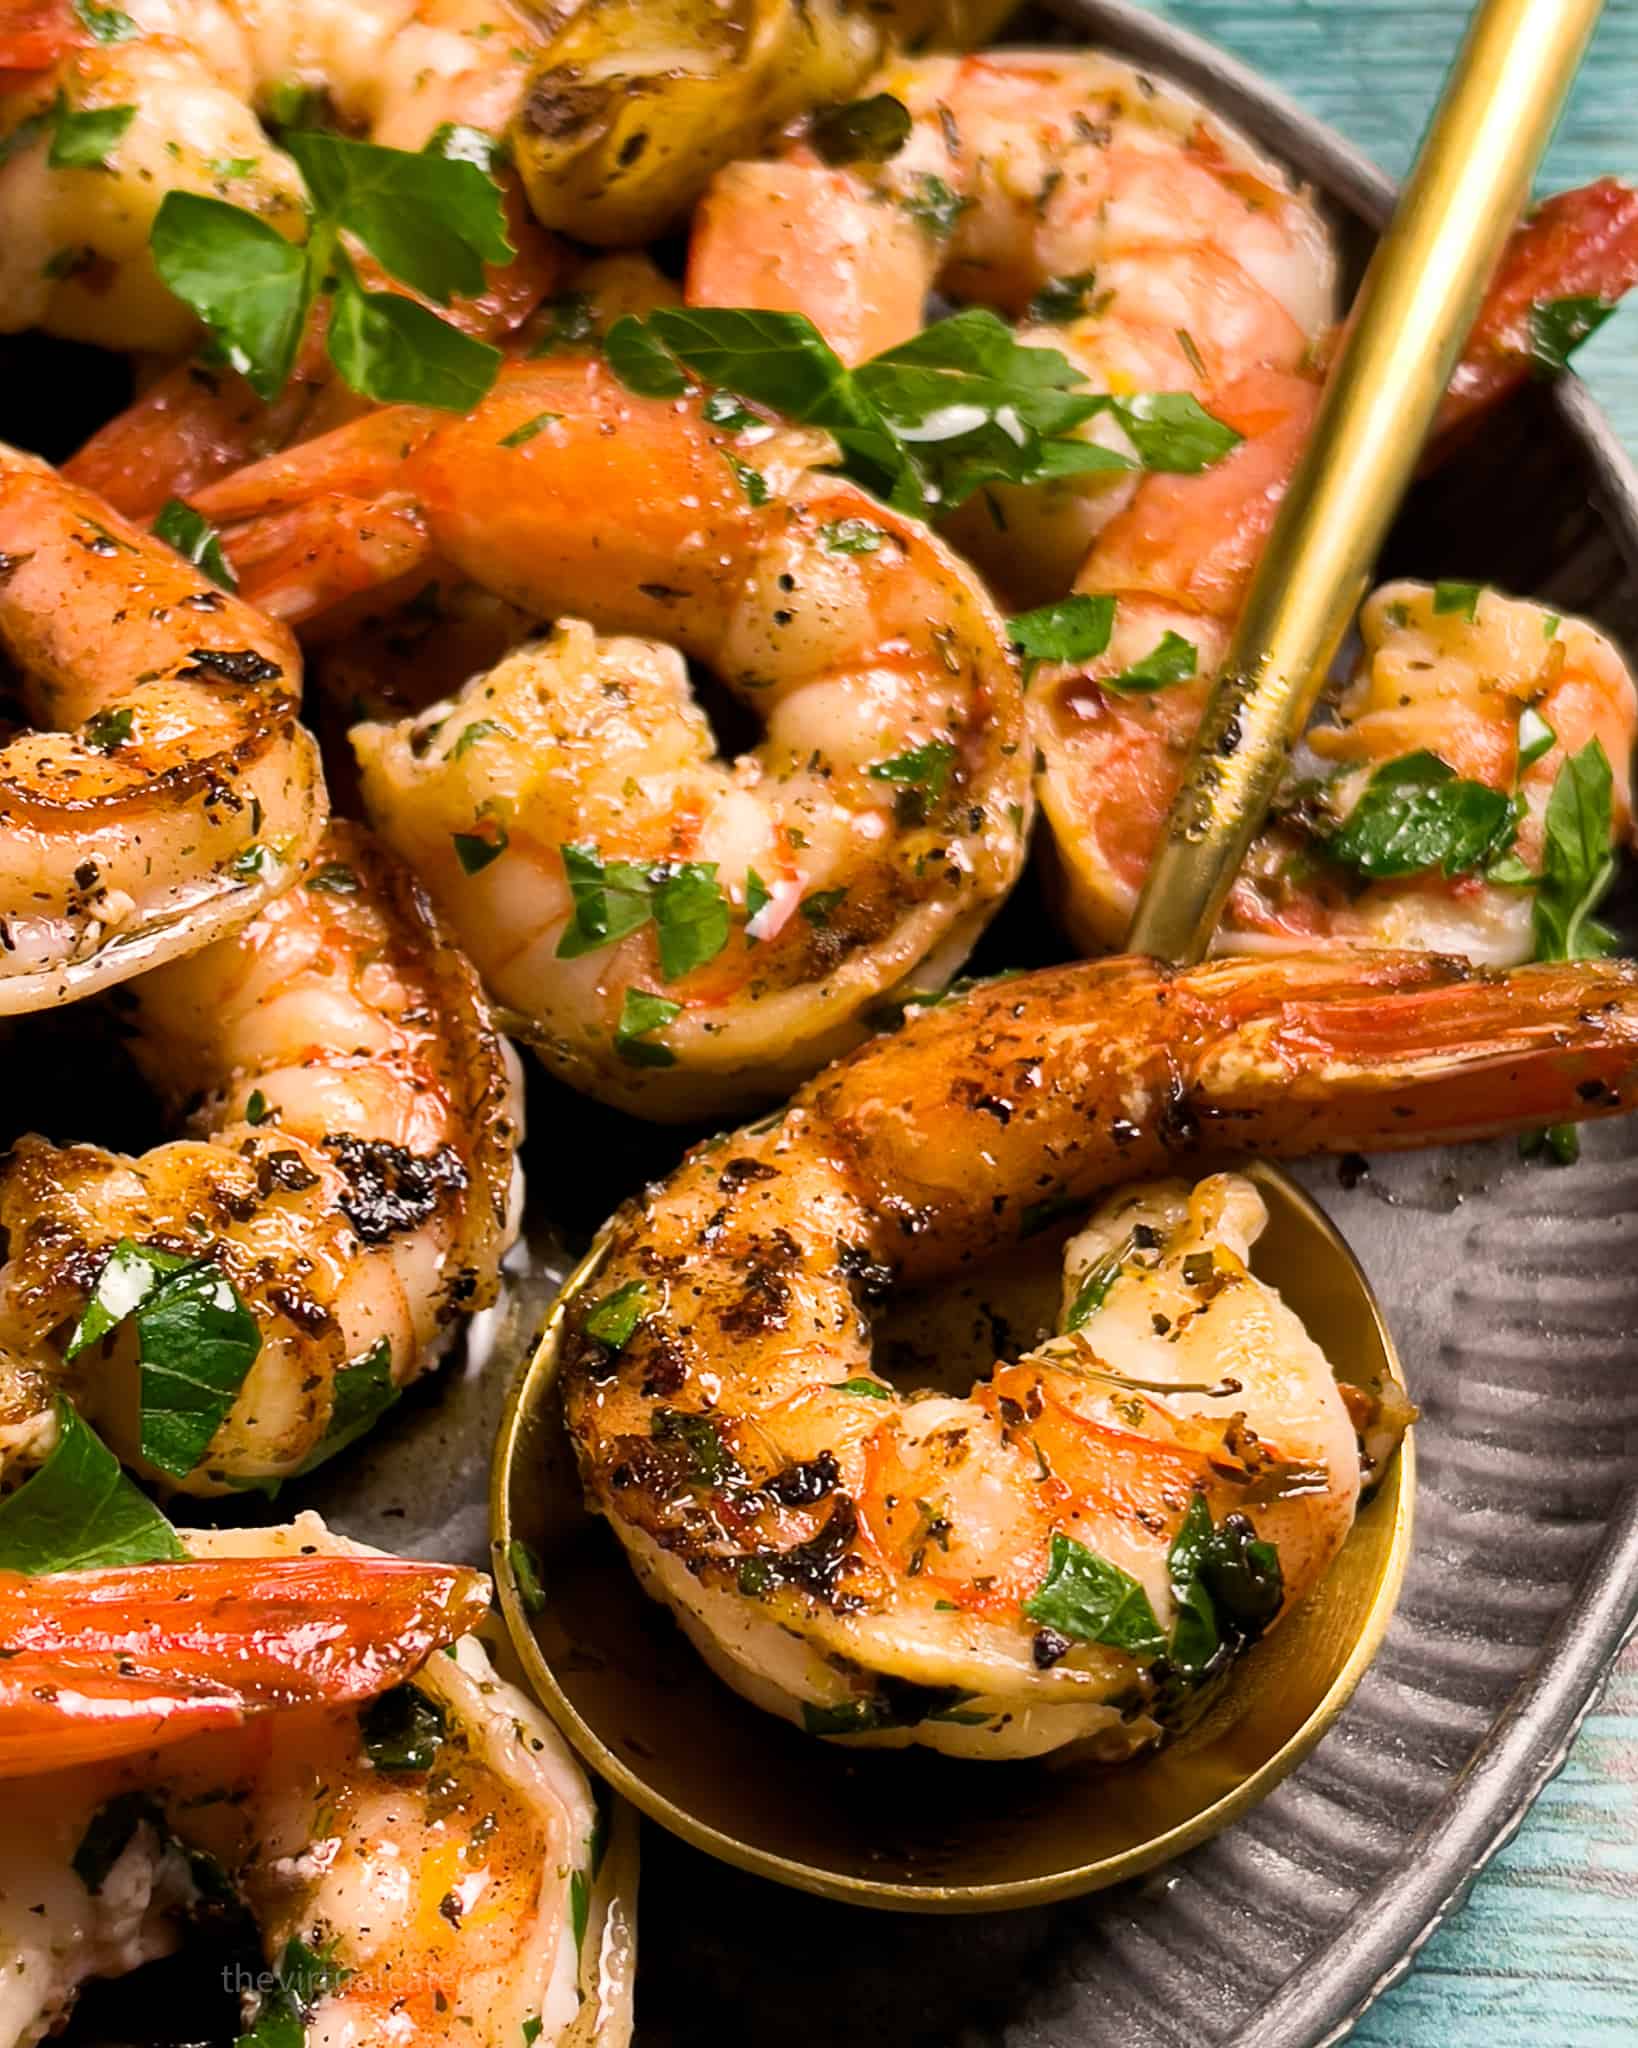
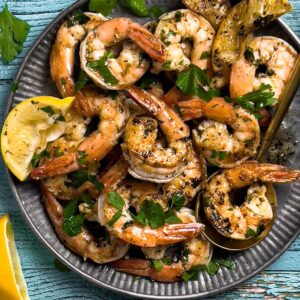
If you've been wondering how to cook pan seared shrimp perfectly, you're in the right place. This step-by-step guide will have you cooking succulent and juicy shrimp every single time!
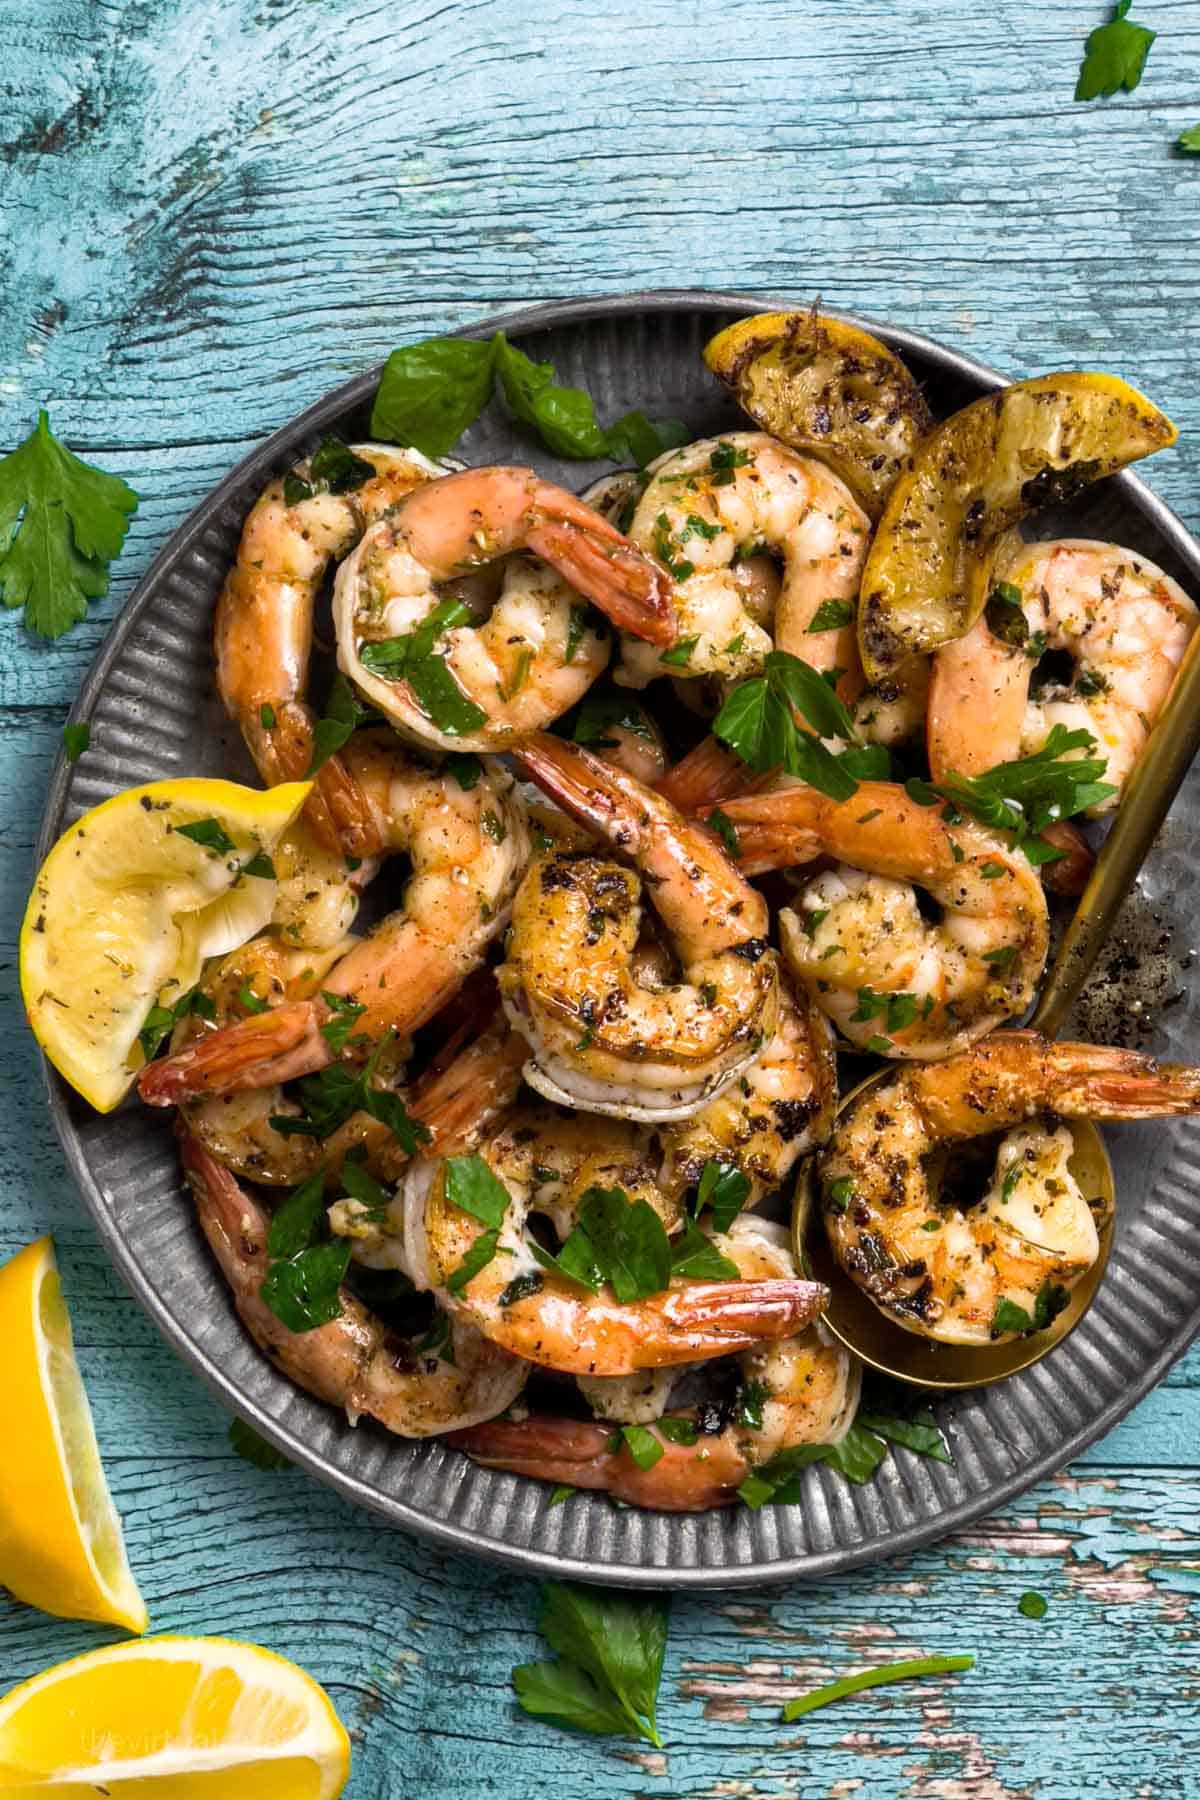
This is a simple, no-fuss pan seared shrimp recipe. Using just 8 ingredients, plus salt and pepper, you will have succulent and tender shrimp ready to eat in under 20 minutes.
Jump to:
? Pan seared shrimp vs. sauteed shrimp
Pan seared shrimp is cooked quickly on high heat without moving (only flipping once) to achieve a flavorful brown crust.
Sauteed shrimp are quickly cooked in a sauté pan over high heat while moving the shrimp around until fully cooked through. Sauteed shrimp does not have a flavorful brown crust.
? Should I use fresh or frozen shrimp?
The choice is up to you!
Frozen shrimp are nice because you can store them at home easily. Fresh shrimp need to be cooked on the day of purchase for the best flavor and results.
I recommend buying shrimp that are already shelled and deveined. Of course, you can purchase shrimp with the shell (so much flavor), but you will have to devein the shrimp yourself (leave the tail on). See a video on how to devein shrimp here.
The shrimp I used for this recipe were purchased frozen from Costco. 21-25 shrimp per pound, shelled, raw, deveined, with tail on.
You can use bigger shrimp, but the cooking time will vary a little. Just follow the steps below with all the tips, and they will turn out perfectly!
How long does it take frozen shrimp to thaw?
It takes about 12 hours to defrost shrimp in the refrigerator and only about 20 minutes to defrost shrimp in a bowl of cool water.
? What kind of pan should I use?
I highly recommend using a cast iron skillet. It is a magnificent cooking tool! They are affordable and last forever if you take good care of them.
Cast iron pans heat evenly and hold heat well, resulting in a nice sear for meat, poultry, fish, and seafood dishes.
What if I don't have a cast iron pan?
If you don't have a cast iron pan, use a heavy-bottomed skillet (not nonstick).
? Ingredients
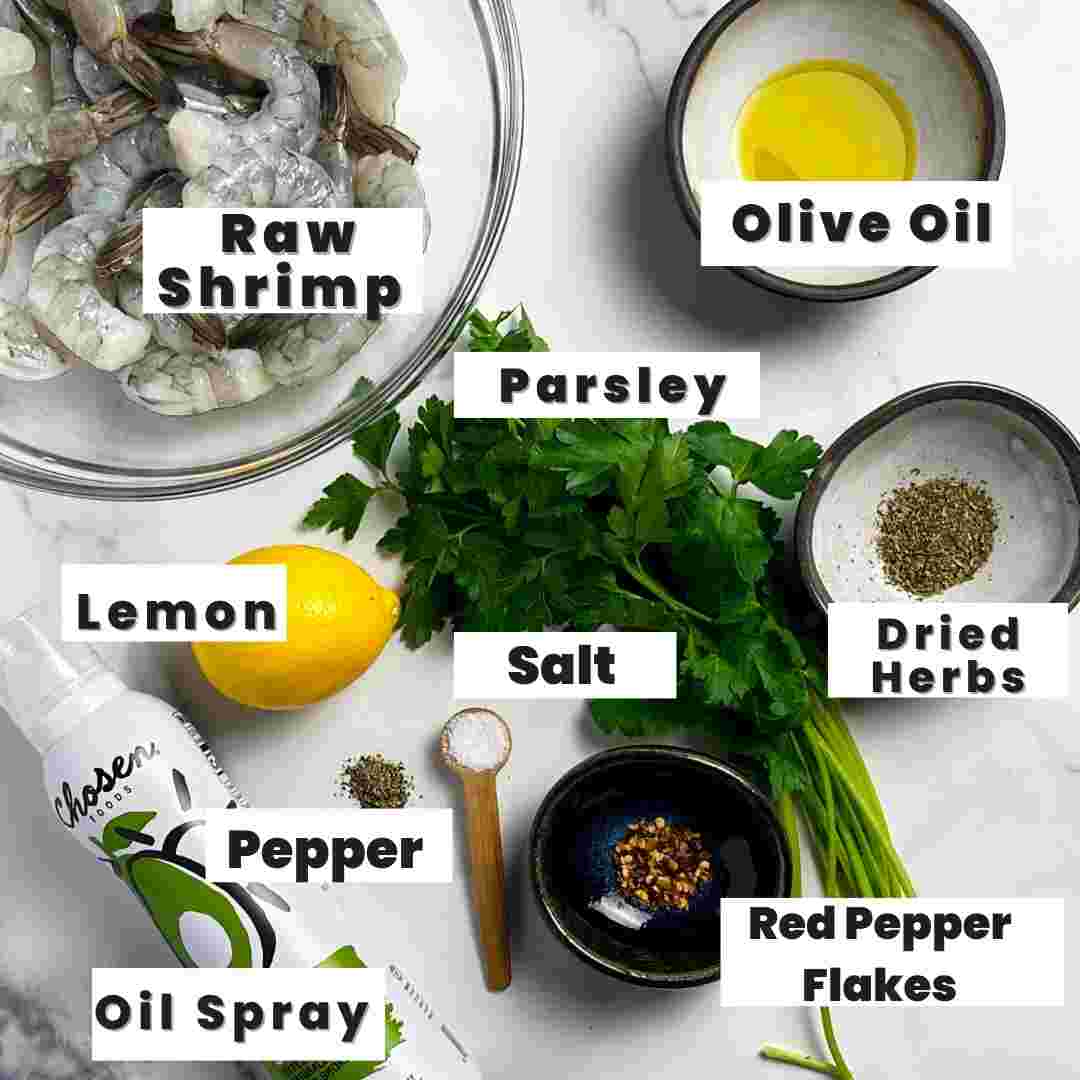
- Raw shrimp: 21-25 per pound, peeled and deveined with the tail on.
- OilSpray:- olive oil, avocado oil, or butter if you want a little more richness in this dish.
- Olive oil
- Lemon: zest + juice
- Fresh parsley
- Dried herbs: I used tarragon and thyme
- Red pepper flakes (optional)
- Black Pepper
- Kosher Salt or Sea Salt
See the recipe card for quantities.
? Equipment
- Cast Iron Pan or skillet, not nonstick (Nonstick skillets won't sear the shrimp to get the flavorful brown crust.)
- Microplane
- Chef's Knife
- Cutting Board
- Medium - Large Bowl
? How to prepare
If using frozen shrimp, defrost the shrimp in a bowl of cold water, changing the water every 10 minutes. Shrimp should defrost in about 20-30 minutes, depending on the temperature of your kitchen.
Handling raw shrimp
Follow food safety tips when handling raw seafood to prevent illness. See below recipe card for more info.
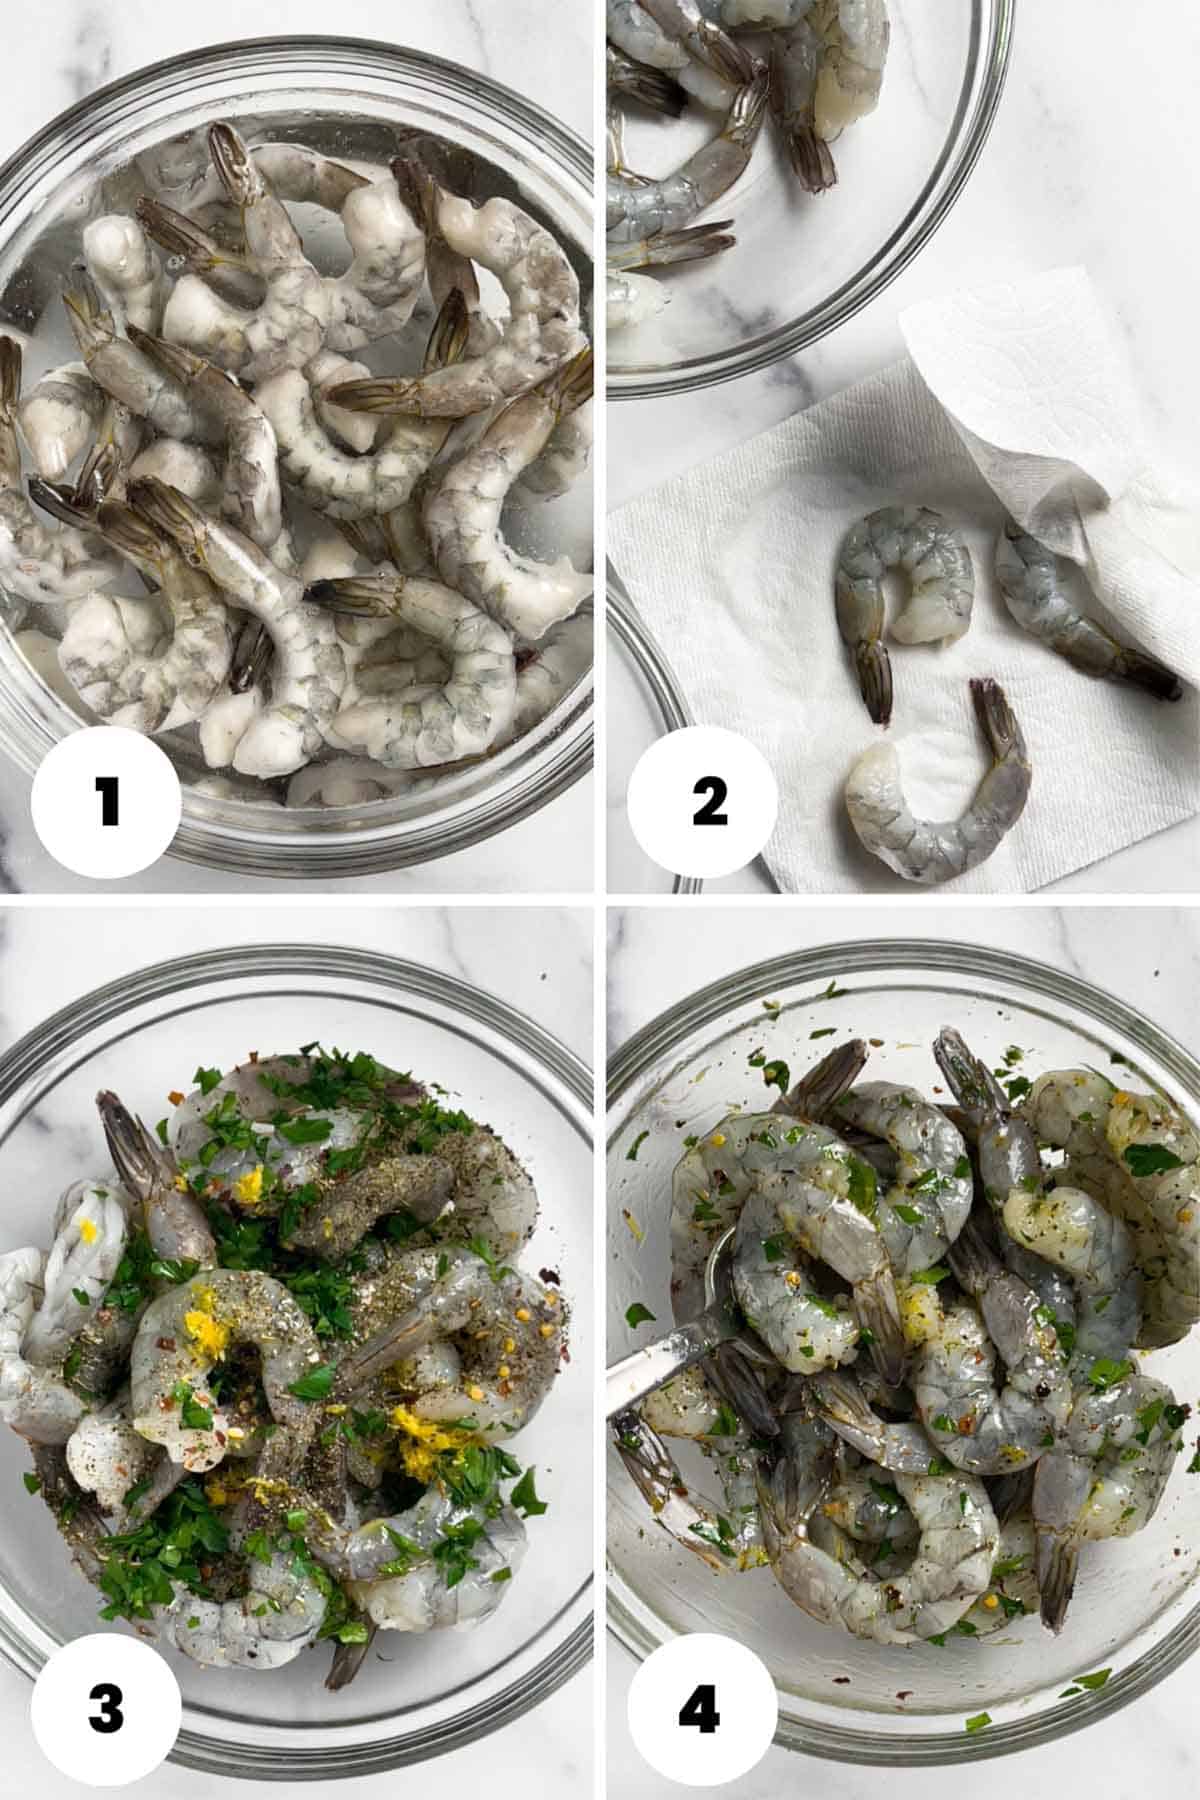
#1 - Rinse the shrimp
- Rinse shrimp under cold running water in a bowl. (Skip this step if using frozen shrimp.)
- Drain. Be sure to drain as much of the water from the bowl as possible.
#2 - Dry the shrimp
- Blot the shrimp dry with clean paper towels and place them in a dry bowl.
Drying the shrimp ensures that the shrimp will sear instead of steam. If the shrimp are still damp with water (or a liquid other than oil), they will not develop a crust when searing.
#3 - Season the Shrimp
- Add the seasonings and oil to the shrimp:
- 1 ½ tablespoon - Olive oil
- 1 teaspoon - Lemon Zest
- 1 tablespoon - Fresh parsley
- ¼ teaspoon each - Dried Tarragon and Thyme
- ½ teaspoon - Red pepper flakes (optional)
- ¼ teaspoon - Black Pepper
- ½ teaspoon - Kosher Salt or Sea Salt
- Using a spoon, gently fold all of the seasonings into the shrimp until they are well coated.
Seasoning the shrimp adds flavor! The good news here is that you can add almost any flavoring you want to shrimp.
What is the best seasoning for shrimp?
That is up to you! What flavors do you enjoy, and what type of dish are you preparing with the shrimp? See the seasoning ideas section for more suggestions.
Be cautious when marinating shrimp with acids like lemon or lime juice. The acids slowly cook the shrimp during the marination process. I prefer to use lemon zest in the marinade to prevent the possibility of overcooking the shrimp.
?Seasoning Ideas
You can easily change the flavor profile for this pan-seared shrimp recipe. Here are just a few suggestions, but the options are limitless!
- Lemon: instead of lemon, you can use fresh lime or orange.
- Parsley - use cilantro or fresh dill instead of parsley. Or use a combo of them all!
- Dried herbs: replace dried herbs with Italian seasoning, chili powder, or smoked paprika for a different flavor profile.
- Spray Oil: If you want to make this a more decadent dish, replace the spray oil with 3 tablespoons of butter.
#4 - Marinate the Shrimp
- Let the shrimp sit at room temperature for 10-30 minutes to allow time to absorb the flavors of the seasonings. (optional).
I am a huge fan of marinating meat, poultry, and seafood before I sear them; I feel it takes food to the next level.
If you're starving and don't want to wait 10-30 more minutes to eat, then you can cook the shrimp right away. They will still taste absolutely delicious!
How long should I marinate shrimp?
It's safe to marinate shrimp at room temperature for 30 minutes or less. If you want to marinate shrimp longer, then stick them in the fridge for up to 1 hour. They don't need more time to marinate than 1 hour.
? How to cook
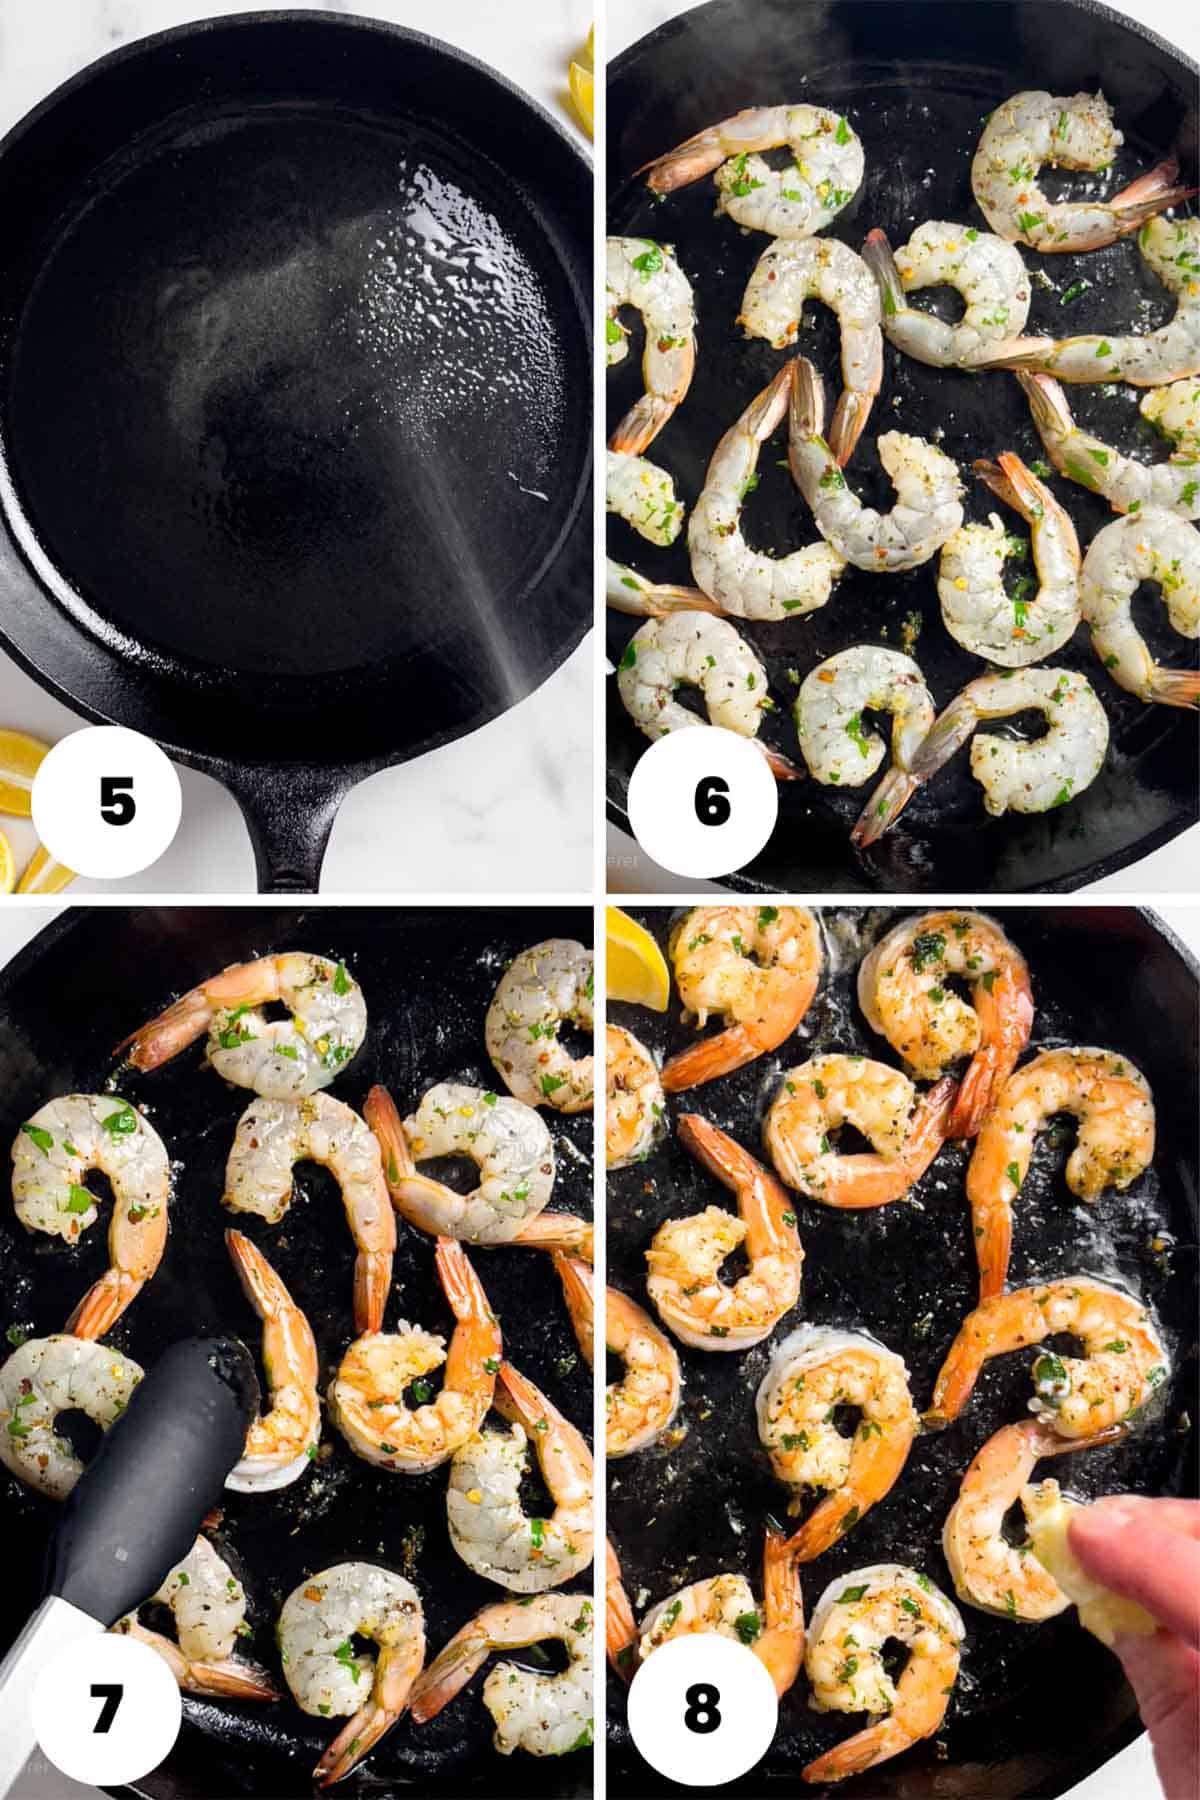
#5 - Preheat the pan
- Spray your pan of choice with the cooking oil and set over medium-high heat for 2-3 minutes or until the pan is to temperature.
How do you know when your pan is ready?
You will notice the pan start to glisten and smoke lightly, and that's when it's time to start cooking the shrimp.
#6 - Sear the shrimp
- Add half of the shrimp to the pan in an even layer.
- Cook the shrimp in batches. I say this for two reasons:
- This leaves plenty of room in the pan for the shrimp to sear and develop a crust as they cook without overcrowding. Overcrowding your pan will cause the shrimp to steam more than sear.
- The drippings from the first batch will create a nice char for your second batch. Mix the two batches together at the end for more charred bits in the dish.
How do you know when shrimp are ready to flip?
Watch your shrimp carefully. Watch the bottom of the shrimp as the side turns opaque. When the shrimp have turned from translucent to opaque about halfway up, that's when it's time to flip. (Approximately 1-2 minutes)
#8 + 9 - Flip the shrimp and add lemon juice
- Then, flip each shrimp, one at a time, as they are ready. As you flip the shrimp, squeeze each piece with a touch of fresh lemon juice. You should hear a nice sizzle. Cook for 30 seconds to 1 minute longer, or until just done.
You can skip adding the lemon juice if you fear it will ruin your sear. I have found that it's not enough liquid to ruin the sear. I use it as my insurance policy that the shrimp taste good even if they are slightly overcooked.
Adding the lemon juice at this time ensures the shrimp will still be juicy and tender, even if they get slightly overcooked.
How do you tell when pan seared shrimp are done?
- Color: opaque and pink with red tails
- Shape: The shrimp will form a nice "C" shape when cooked perfectly. You want a little space between the head of the shrimp and the tail. If they are overcooked, the shape will be more of a tight "C" or "O" shape.
#10 - Remove from heat quickly
- Not all of the shrimp will be done at the same time. Stand over the pan and remove each shrimp as it looks ready.
- Immediately remove the shrimp from the pan when they look perfect. The shrimp will continue to cook even though they are no longer on the stove or in the pan. This is called carry-over cooking. You want to remove the shrimp from the pan just a few seconds before they are fully done.
You don't want to overcook the shrimp; it can happen quickly!
# 8 - Add fresh herbs and serve
? Shrimp Dinner Ideas
While eating these delicious shrimp on their own is more than dinner-worthy, here are a few more dinner ideas you can use for this pan-seared shrimp:
- Shrimp Tacos: Replace the dried herbs, lemon, and parsley with chili powder, lime, and cilantro for a tasty shrimp taco night!
- Shrimp Caesar Salad: Add these shrimp to a Caesar Salad for a light and healthy dinner.
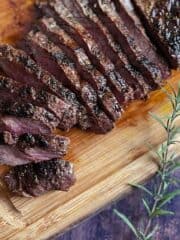
- Surf and Turf: Get fancy for a date night or a dinner party and serve these shrimp with Flat Iron Steak and Crispy Smashed Potatoes and top with caper cream sauce to really impress!
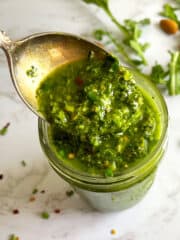
- Seared Shrimp Cocktail Appetizer: Serve this shrimp with a quick aioli made with 2 tablespoons of mayonnaise and 1 tablespoon of chimichurri.
- Seafood Appetizers: Serve these shrimp as an appetizer with some crab cake appetizers for your seafood-loving friends.
- Like spicy food? Make this shrimp in spicy tomato sauce for a quick and elegant dinner.
? Storage
Refrigerate the cooked shrimp, covered, in an airtight container for up to 2 days.
A few dishes to serve with pan seared shrimp:
How did this pan seared shrimp recipe work for you? Was it helpful? I would love to know your thoughts in the comments. Happy cooking and eating! Suzie
Recipe
How to Cook Perfect Pan Seared Shrimp
Click the stars to rate.
*Easily adjust serving size to your liking by clicking the number under servings or with the boxes below in the ingredients section.
Equipment
- Cast Iron Pan best option for searing the shrimp
- Microplane for grating the lemon zest
Ingredients
- 1 pound Raw Shrimp about 23 shrimp per pound, preferably shelled and deveined with tail on
- 1 ½ tablespoon Olive Oil
- Oil Spray
- 1 whole Lemon 1 teaspoon zest + juice as needed
- ¼ teaspoon Dried Thyme
- ¼ teaspoon Dried Tarragon
- 3 tablespoon Chopped Parsley
- ½ teaspoon Crushed Red Pepper Flakes optional
- ¼ teaspoon Black Pepper
- ½ teaspoon Kosher Salt or pink salt
Instructions
Prepare the shrimp
- If using frozen shrimp, defrost the shrimp in a bowl of cold water, changing the water every 10 minutes. Shrimp should defrost in about 20 - 30 minutes depending on the temperature of your kitchen. (Skip this step if using fresh or defrosted shrimp).
- Rinse shrimp under cold running water in a bowl. (Skip this step if using frozen shrimp.)
- Drain well.
- Blot the shrimp dry with clean paper towels and place them into a dry bowl. Be sure there is no trace of water on the shrimp. *Drying the shrimp ensures that the shrimp will sear instead of steam. If the shrimp are still damp with water (or liquid other than oil) they will not develop a crust when searing.
- Chop parsley and set aside.
- Add the lemon zest, dried herbs, crushed red pepper, salt, pepper, 1 tablespoon of fresh parsley, and olive oil to the shrimp. Using a spoon, gently fold all of the seasonings into the shrimp until they are well coated.
- Let the shrimp sit at room temperature for 10 - 30 minutes to allow time to absorb the flavors of the seasonings. (optional)
Cook the shrimp
- Spray your pan of choice with the cooking oil and set over medium-high heat for 2-3 minutes or until the pan is to temperature.
- Cooking in batches, add half of the shrimp to the pan. Watch the shrimp the whole time they are cooking - this is so important!*Don't crowd the shrimp. Leave space between each piece so the shrimp has a chance to sear. If you don't give the shrimp space to sear they will steam rather than sear. *Watch your shrimp carefully. Watch the bottom of the shrimp as the side turns opaque. When the shrimp have turned from translucent to opaque about halfway up, that's when it's time to flip. (Approximately 1-2 minutes)
- Then, flip each shrimp, one at a time as they are ready. As you flip the shrimp, squeeze each piece with a touch of fresh lemon juice. You should hear a nice sizzle. Cook for 30 seconds to 1 minute longer, or until just done. *How to tell when the shrimp is done:Color - Opaque and pink with red tailsShape - When cooked perfectly, the shrimp will form a nice "C" shape. You want a little space between the head of the shrimp and the tail. If they are overcooked the shape will be more of a tight "C" or "O" shape.
- Remove shrimp from heat quickly!*Not all of the shrimp will be done at the same time. Stand over the pan and remove each shrimp as it looks ready. *Immediately remove the shrimp from the pan when they look perfect. The shrimp will continue to cook even though they are no longer on the stove or in the pan. This is called carryover cooking. Ideally, you want to remove the shrimp from the pan just a few seconds before they are fully done.
- Add the rest of the fresh parsley and serve!
Notes
What If I Don't Have A Cast Iron Pan?
If you don't have a cast iron pan, use a heavy-bottomed skillet (not nonstick).Handling Raw Shrimp:
*Follow food safety tips when handling raw seafood to prevent illness. See below recipe card for more info. *Be cautious when marinating shrimp with acids like lemon or lime juice. The acids slowly cook the shrimp during the marination process. *Marinating shrimp at room temperature for 30 minutes or less is safe. If you want to marinate shrimp longer, then stick them in the fridge for up to 1 hour.Nutrition
??? Food safety
- Do not put the cooked seafood in the same bowl as the raw seafood. Always wash dishes that have been contaminated by raw seafood well before using them for cooked foods.
- Do not use the same utensils on cooked food, that previously touched raw seafood
- Wash hands after touching raw seafood
- Don't leave food sitting out at room temperature for extended periods
- Never leave cooking food unattended
- Use oils with a high smoking point to avoid harmful compounds
- Always have good ventilation when using a gas stove
See more guidelines at USDA.gov.

Julia Torres
The instructions to blot dry the shrimp and make sure the iron skillet was very hot, and not to over crowd the shrimp while cooking were a great help. These were the best shrimp I have ever cooked. Wish I could attachmy photo so you could see how great they look. Thanks!!!
Suzie J.
I love hearing this, Julia! Thank you for sharing. I don't have a way for readers to share photos here just yet, but you can always tag me on Instagram if you're on there @thevirtualcaterer. I would love to see! Cheers, Suzie ?
Annette b
I kinda winged it since I was cooking less than a pound. But I thought the techniques were a plus as were the spices.i put my shrimp into a nice big salad. I’ll make thus again
Suzie J.
Thank you for trying my recipe and sharing your experience, Annette!